How to Upload Pictures From Windows Media
If you've used PC's in the by, chances are pretty proficient that you lot're at least somewhat familiar with Windows Media Actor. It has been included in every Windows operating system since 1991's Windows 3.0. The version that shipped with Windows 7 is only the almost contempo incarnation and it is not bachelor for machines running before versions of Windows (such equally XP or Vista.)
If you're not familiar with information technology, Windows Media Player is the software that will allow you to play and organize all of your music and videos. If you lot are connected to the internet, it volition even go online and detect data for the songs or albums you are listening to, including the original album's artwork.
You can also watch streaming media and DVD's on information technology.
To launch Windows Media Player, simply click information technology's icon in the task bar:  .
.
Adding Files to the Media Thespian library
Media Player organizes all of your music files and movies into libraries. The files in these libraries are not necessarily all found in the aforementioned folder. For example, some music files in a single library may be in the Music binder while others are in the Documents folder. It doesn't matter to Media Player, information technology will notwithstanding organize all of these files past Creative person or Album or Genre.
There are several means to add together new music to the Media Player library. One is to merely drag the files into the Music binder. This is the default folder in which Media Player searches to detect music.
You can also tell Media Player where to look to notice the music files. For instance, you may keep all of your music on an external disk bulldoze. To include these in Media Histrion libraries, launch the Media Thespian and click "Organize" in the upper left mitt corner.
You will run into a window like this:
To add a new folder to the library, click the Add together button and browse for the new location. Add as many locations equally yous'd like, then click OK.
Media Player does not automatically update the data, then you'll probably sit in that location after clicking OK and retrieve that you didn't do it correct. Relax. Yous're fine. All y'all have to do is click Organize, and so Use Media Information Changes. Media Actor will then update its libraries.
Once you have the library locations set up, Media Thespian will proceed to monitor them. If you add together music to any of these folders, Media Actor will automatically detect it. The same is truthful if you delete any.
Another manner to add together music to your library is by "Ripping" a CD. Nosotros'll talk about this in more than item a little bit later.
Controlling Now Playing Items
When you have a song playing, Media Actor gives you all the options y'all need to "control" information technology. This includes pausing the file, stopping the file, play, mute, and volume. The controls are pictured in the next snapshot.

 Shuffles the files on a CD, DVD, or a playlist. They are then played in random club.
 Turns repeat on so the current rails is played again.
 Stops a rails (or file) from playing.
 Here you lot have rewind, play/pause, and fast forward. The Play/Intermission button shows a frontward arrow when a rail is paused. The forward arrow ways play, so you'd push information technology when you're ready to play the track. The two parallel lines mean pause. Information technology is showing when a track is playing, letting you know what to click if you need to pause.
 Mute. If you lot click this, the runway will keep playing, but you will non hear audio.
 This is the volume adjustment. Move it to the right to increase volume.
Playing CDs and DVDs
To play a CD or DVD, insert the CD or DVD in the CD drive in your figurer. Make certain it'southward placed in correctly with the label side up. From in that location, Media Player makes your chore easy. It typically pulls upwardly Media Player correct away and even identifies the album, vocal, and comprehend fine art -- or moving picture.
Playing Videos and TV
To play a video, get to the Navigation Pane on the left side of Media Histrion and click Videos. Double click on the video yous desire to meet and watch it on Media Role player. If y'all desire to resize the screen, press ALT and Enter to get in fill up the screen.
Spotter recorded TV shows by clicking Recorded TV in the Navigation Pane.
Playing Music Files
Whenever y'all play a vocal or an album, Media Player places that song or album in your At present Playing listing. The Now Playing list is simply a list of the files that are in queue to play -- one afterward the other.
To play music files, you lot can practice whatsoever of these things:
o Go to the taskbar, bring up libraries, and double click the Music library. Right click on the song you desire to hear and click play..
o Add items to queue in your Music library by clicking Add to Windows Media Player play list..
o Double click on a song file. It volition exist played immediately.
Creating and Saving Playlists
A playlist is defined as a list of songs that are grouped together and play in a certain order. You lot tin create a playlist of your favorite songs or certain genres, and so easily play those lists whenever you want -- without the hassle of searching for them in your library and adding them to the queue.
To create a playlist:
Open Media Actor and click Playlists in the Navigation Pane.
Select Create Playlist from the margin below the Carte du jour Bar.
A box will open up below the give-and-take Playlist in the Navigation Pane. Type in a proper noun for your new playlist, as nosotros've done below. You volition now see the playlist equally an icon under Title in the center of your Media Role player.
Now, right click on the songs in your library that you want to add together, click Add to>Playlist. Y'all can as well elevate and drop them onto the right side of the Media Player screen.
To save your playlist, click Salve Listing at the top of the list.
Ripping CDs to Your PC
When you lot a rip a CD, y'all copy the music from your CD to your estimator so you tin can play the music without loading the CD.
To re-create CDs to your computer, load a CD in your CD bulldoze. In Media Player, put checkmarks next to the tracks you desire to rip. Then click the Rip CD button, as pictured in the following snapshot.
Burning music CDs
When you lot fire music to a CD, y'all record it to the CD. Yous tin can burn down any music files y'all desire to CD. Even so, you cannot re-create one CD to the other. Y'all'll first have to rip music from i CD to your hard drive, and so burn it to another CD. Irksome? Aye. But well worth it if you desire to fire songs you love to CD.
To burn a CD:
o Insert a bare (recordable) CD into your CD bulldoze.
o Go to the Navigation Pane in Media Player and click the Music category, then Album to run across your saved CDs.
o Right click on the album in the library. Cull Add together To, then choose Burn Listing.
You can besides burn playlists to CD so you're non stuck burning just entire albums.
o Click the Start Burn button when you're ready.
Moving Songs to a Portable Player
Window'due south Media Player is not compatible with all portable devices. For example, it doesn't recognize Apple'due south iPod or Microsoft'southward own Zune. Possibly that'southward why most people don't use Media Role player to transfer music. Instead, they use the software that comes with the portable device that they own.
That's not to say you tin't use Media Player. Hither'due south how you do information technology (if your device is compatible):
o Connect the player to the computer.
o Showtime Media Player. If Media Player recognizes your device, the Sync List will announced on the edge of Media Player.
o If y'all have your device set to Sync Automatically, Media Histrion will automatically get-go copying all files in Media Histrion to your device.
o If your role player is set to Sync Manually, click on Cease. And so you can tell Media Histrion which music to copy to the player. You tin can practice this by creating playlists, then right clicking to add them to the Sync list.
Photos and Movies
In that location was a time when using a calculator meant using a word processor or spread sheet or playing a unproblematic game like Solitaire. It was but a tool to aid us complete our daily tasks in as efficient a way as possible. It'due south not like that anymore. Computers have become all-purpose entertainment centers. Nosotros watch movies on them, read the news, connect with friends and family unit, share photos, play games and complete our homework.
In the one-time days, nosotros'd organize our photos into actual physical albums that saturday on a bookshelf. Our domicile movie library might consist of shelf after shelf of VHS tapes or DVDs. And since there wasn't anyone around willing to take on the gargantuan chore of putting them into alphabetical club by title, or event, or appointment, the task commonly went undone.
In this article, we'll prove you how to import, share, and organize your photos and movies.
Moving Photos from Your Photographic camera to the Computer
Importing pictures and videos from your photographic camera is incredibly like shooting fish in a barrel in Windows 7. In fact, all y'all really accept to do is plug information technology in. Windows will install the device's commuter if it needs to (although information technology commonly just sees the camera's memory card as another drive) and the AutoPlay window will open up.
From hither you can choose to have Windows automatically import the pictures and videos, or yous tin can open up up the folder to expect at the files just similar you tin can for whatsoever other disk drive. Yous'd be able to elevate and drop pictures from this folder to any other binder in Windows. You could also easily delete them if you wanted.
But nosotros're just going to have Windows import our pictures and videos, so we'll select that. If you want Windows to automatically import the pictures and videos whatever time you connect a device that has windows or pictures on it, you can check the "Always practise this for pictures" box.
Nosotros will and so encounter the Import Pictures and Videos screen.
From here we can enter a tag for our photos so nosotros'll be able to identify them easier on our computer. We've used the tag "Tennessee Summer." If you lot were to click "Import" now, a new folder would automatically be created in the Pictures binder in you're My Documents directory and the pictures would be put into it. If yous would like to save the pictures to a different location, click the "Import settings" command in the lower left hand portion of the screen. You will then run across a window that looks similar this:
Here you lot tin can set the defaults. For instance, in this case, images are to be copied to the My Pictures folder, while videos are to exist copied to My Videos. You can change these past using the driblet-downward card, or clicking "Browse" and selecting the location.
If you'd similar to delete the pictures on your camera after Windows imports them, make certain the "Always erase from device afterward importing" box is checked.
Using Libraries to Manage your Photos
Libraries are new to Windows 7. They're just another corking way to manage and organize your documents, pictures, videos, and music. When y'all launch a library, such as the Picture library, information technology looks very much like an ordinary folder.
You tin can meet the pictures in that binder, equally well equally whatsoever sub-folders. At that place is a key difference, though. Accept a look at the words but under "Pictures library" at the top of the screen. It says, "Includes: 2 locations." Unlike an ordinary binder, which tin only show you the files and sub-folders in that detail location, libraries collect files and sub-folders from several locations. So if you lot wanted to see the pictures in the My Pictures folder every bit well as the Shared Pictures binder, you could.
Let'southward click on the words "2 locations" and take a look at how we can add another place on our computer for Windows to look.
Right at present, Windows is gathering photos for this library from just two locations, "My Pictures" and "Public Pictures." Click "Add" to scan to another location then click "OK". The pictures in that location will exist added to the Pictures library. That does not mean they were moved anywhere. If you added pictures from your desktop, those pictures volition stay on your desktop.
By default, Windows 7 comes with only four libraries, and they are each optimized for a specific file. For case, the Video library is optimized for video files, while the Music library is optimized for music.
You can create your own custom library by right-clicking on the word "Libraries" in the console on the left side of whatsoever Library. Then click "New" and "Library."

To optimize your library for a sure kind of file, and choose the folders for Windows to look in, correct-click on that.
Slide Shows
To view your photos equally a slide-show, go to the Picture library and click Slide Prove from the buttons at the top of the screen. This lets you lot look at your pictures in their entirety without anything else on the computer screen.
One time the slide evidence is underway, you can customize the feel past correct-clicking anywhere on the screen.
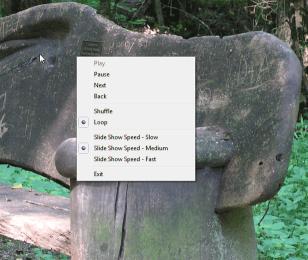
Yous can skip to the next photo, make Windows show pictures randomly, or modify the amount of time each photograph is visible.
Copying Photos to a CD or DVD
Copying photos to CDs or DVDs is incredibly easy and a great way to back up your photos. There are several ways to practice this. The easiest way is to only insert a blank CD or DVD into your computer. Windows will wait at it to encounter if there is already annihilation on it. If there are other images or videos on information technology, you'll be asked whether y'all want to copy those files to your computer or open a folder to view the files on it. This volition open a folder that is merely like any other folder in Windows. You lot tin drag and drop photos or videos directly to information technology, but like dragging it from ane folder to another.
If the disk is blank, you'll see a window only like this:

Click "Burn files to disk"
You will exist asked how you want to format the deejay. There are two options. Ane allows the disk to act very much similar an external disk drive, in which you tin can re-create files to it and delete them at will. The other option simply allows y'all to view files on the disk. Yous cannot move files back and forth at will.
Y'all can also enter a characterization for the disk.
Choose an option, and permit Windows to format the disk. When it'due south done, it'll give you the option of opening the deejay. In one case you do that, you tin drag your photos directly to it.
Emailing Photos
To email a photo, simply select that photo and click "E-mail" at the top of the screen. Please note that yous must have some kind of email client (such every bit Windows Live Mail or Outlook) and exist connected to the cyberspace. Clicking "E-mail" volition automatically launch the email client and create a new message. Follow whatsoever instructions come with your e-mail client to accost and send the email.
Printing Photos
To print a photo, select information technology and click "Print" at the pinnacle of the Library (or binder) window. A new dialog box volition open up, giving you a few more than options.
Here you tin can select a printer from the drib-downwards menu, select paper-size and quality, as well as whether or not you want to print but one image per folio, or multiple images per folio. Click "Print" when you're finished.
Fixing Photos Using Windows Live Photo Gallery
While Windows Alive Photo Gallery is by no ways every bit powerful as Photoshop, it does give you a few basic tools to edit your photos. Unfortunately, Windows Live Photo Gallery is not automatically installed with every copy of Windows 7. Yet, you can still download it from the Microsoft Website for gratuitous. If you lot can't find it on your computer, get tohttp://www.download.live.com/ and get it. Information technology comes bundled with a bunch of other programs that are really indispensible, similar Windows Alive Mail (which is an email client) and Windows Live Messenger, which allows you to conversation with other people over the internet.
Once Windows Alive Photo Gallery is installed, find the photo y'all'd like to prepare on your calculator and double-click on it. This volition launch the Windows Alive Photo Gallery. At the height of this window you'll come across the word "Fix" in the command line. Click this to access the tools to edit your photograph.
The tools, every bit you tin can see in this example, are grouped to the right of the moving picture. Honestly, information technology'd take more time to explain what each of those tools do than it would to only do it, and you all the same wouldn't go the full effect. The best way to see what Windows Live Photo Gallery tin do is to just play with the different effects. And don't worry-you won't ruin the original.
Creating a DVD Movie or Slide Show Using Windows DVD Maker
Windows DVD Maker is another handy program that comes free with Windows vii. What's more, it is capable of making DVDs that actually play dorsum on a DVD histrion. If you're merely interested in copying files or folders to a DVD equally a backup, do not use DVD maker.
To use the Windows DVD Maker, click the start menu and select Windows DVD Maker from the list of programs. If you tin't seem to observe it easily, never fear, merely type "Windows DVD Maker" into the search box on the Kickoff Menu and Windows 7 will observe it and open it for you.
You lot'll see a screen that looks like this:
Utilize the "Add items" button to add the photos to your DVD slide show, then click Next.
On the side by side screen, you tin can preview your video, change the Card text, or customize carte du jour. Again, it'south easier to see what the programme is capable of if yous but play around with each part.
Source: https://www.universalclass.com/articles/computers/using-media-player-movies-and-photos-in-windows-7.htm
0 Response to "How to Upload Pictures From Windows Media"
Postar um comentário